The step-by-step map to go from the print to a checked first part, with seven drawn steps you can follow at any machine

How to read the dimension, pick the gauge, hold the part and set your zero without freezing in front of the lead 60 illustrated pages.

PDF guide for CNC operators and setup trainees · 60 illustrated topics

BUY NOW

🔒 Secure checkout · PDF by email · 30-day guarantee

64pages total · 60 illustrated topics inside
8sections that follow the 7 setup steps
2free bonus books included
PDFby email, ready to print

This Is What the Pages You Will Study Look Like

Designed to read on your phone screen right next to the machine, or print and keep on the bench.

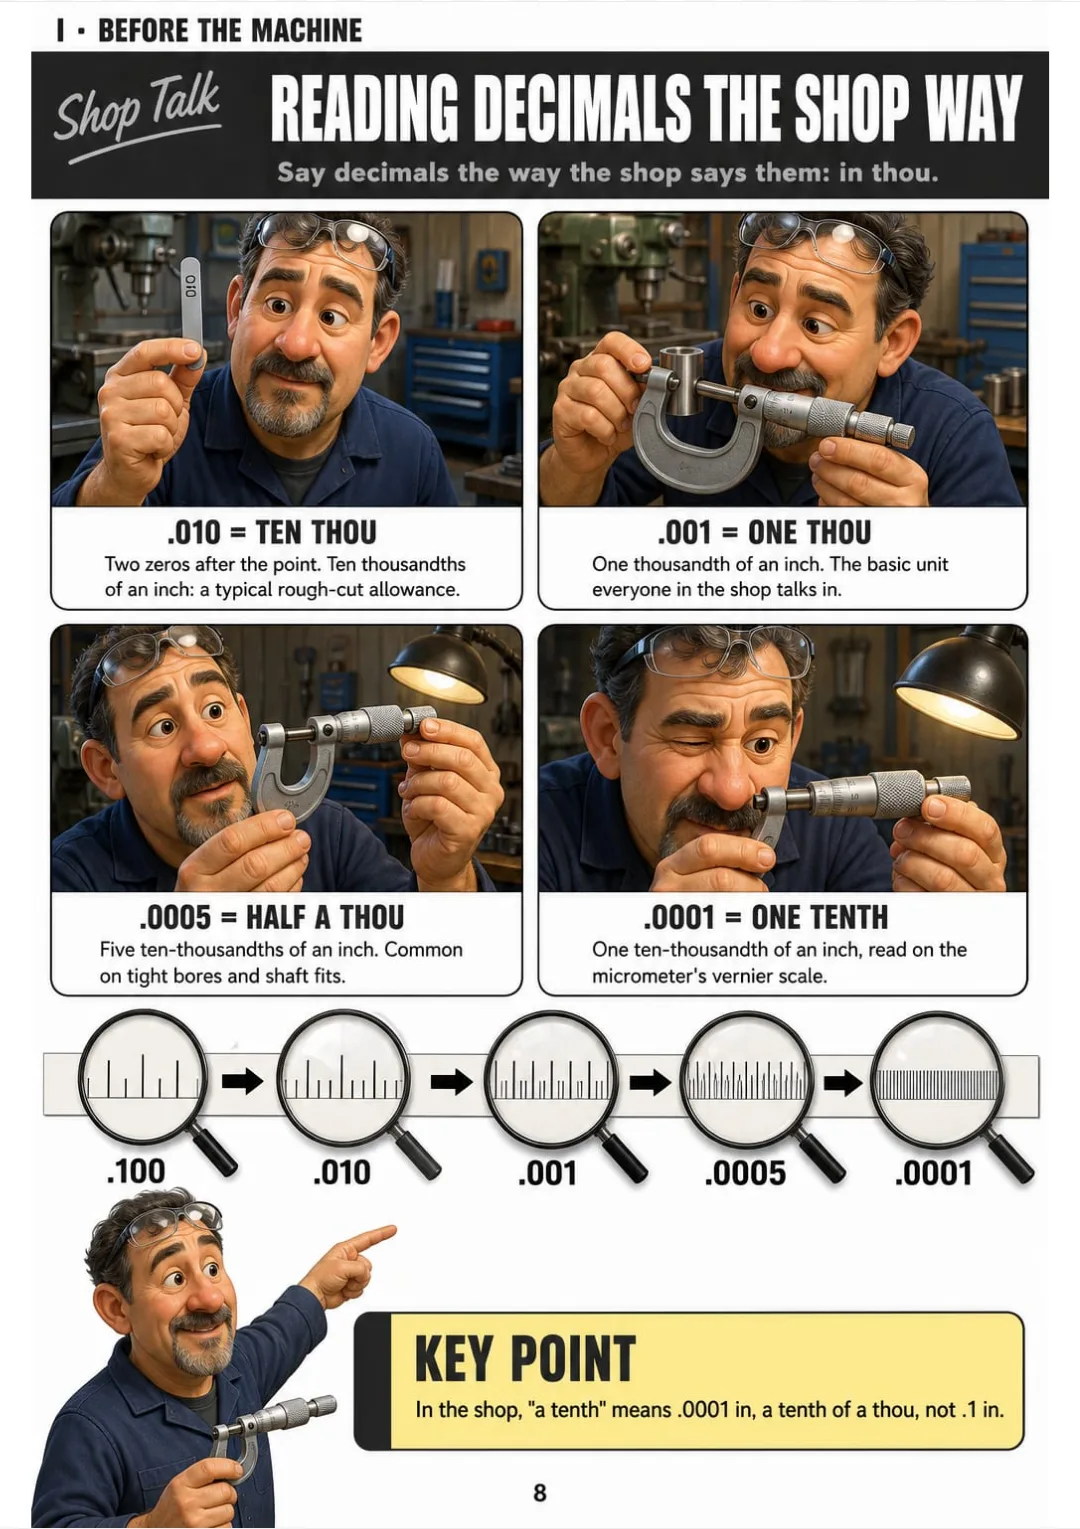
.001 is one thou, .0005 is half a thou, .0001 is a tenth.
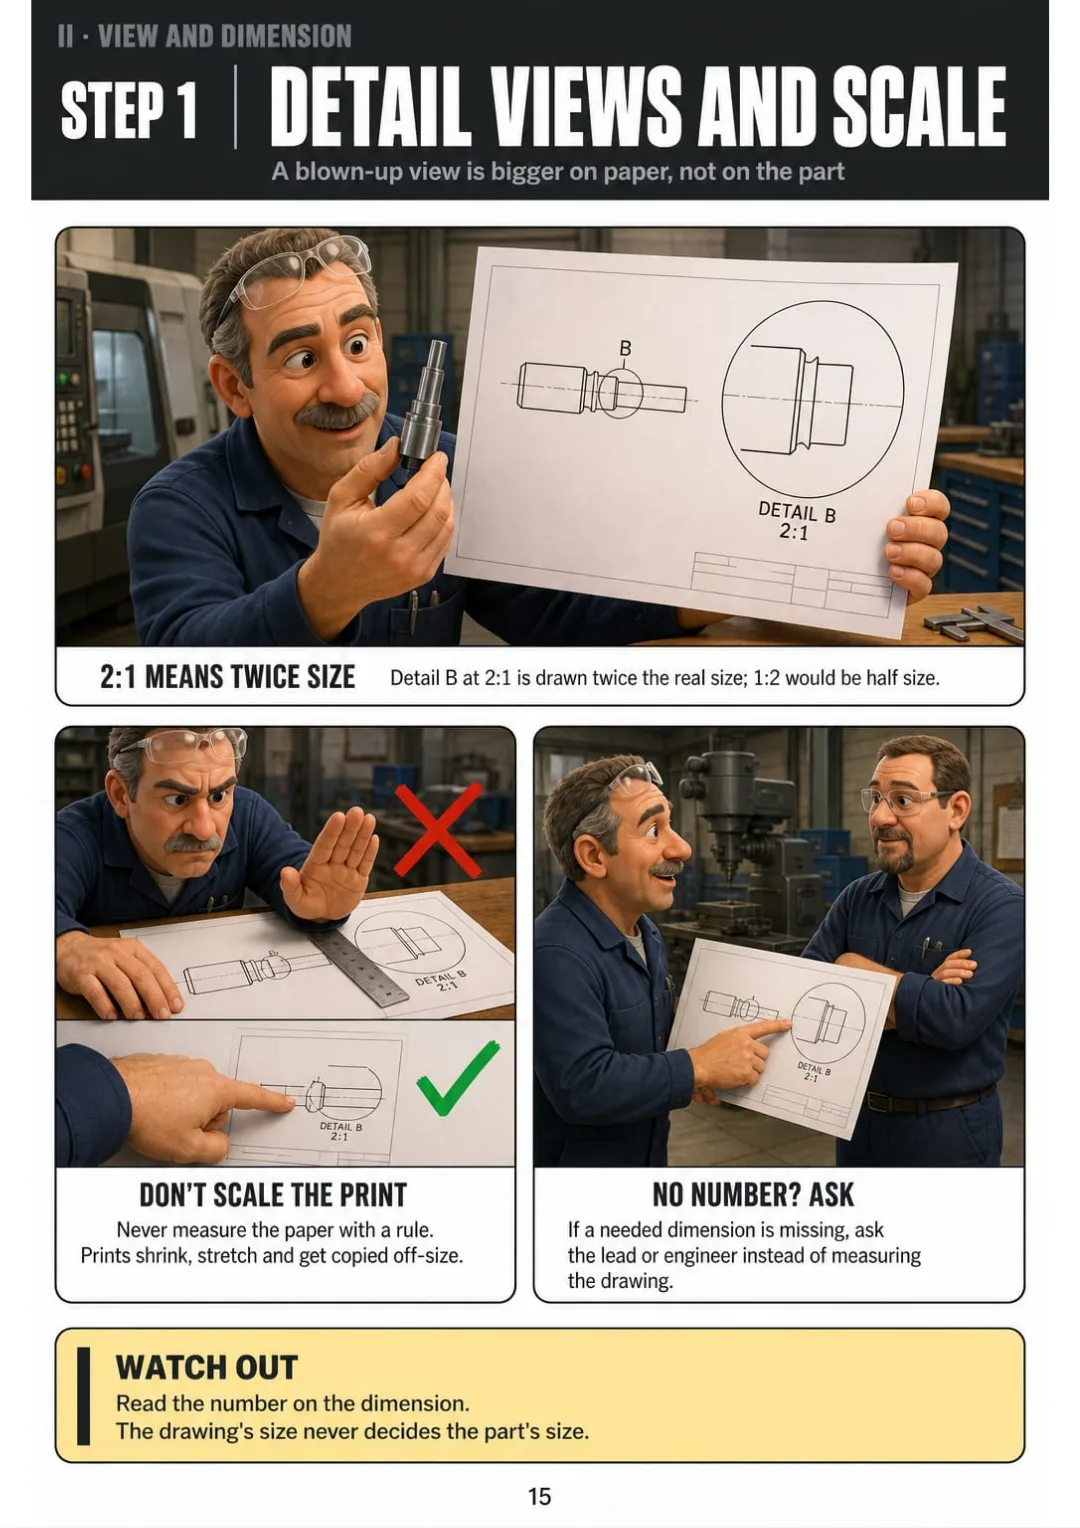
Detail B at 2:1 is twice real size. Never scale the print: read the number.
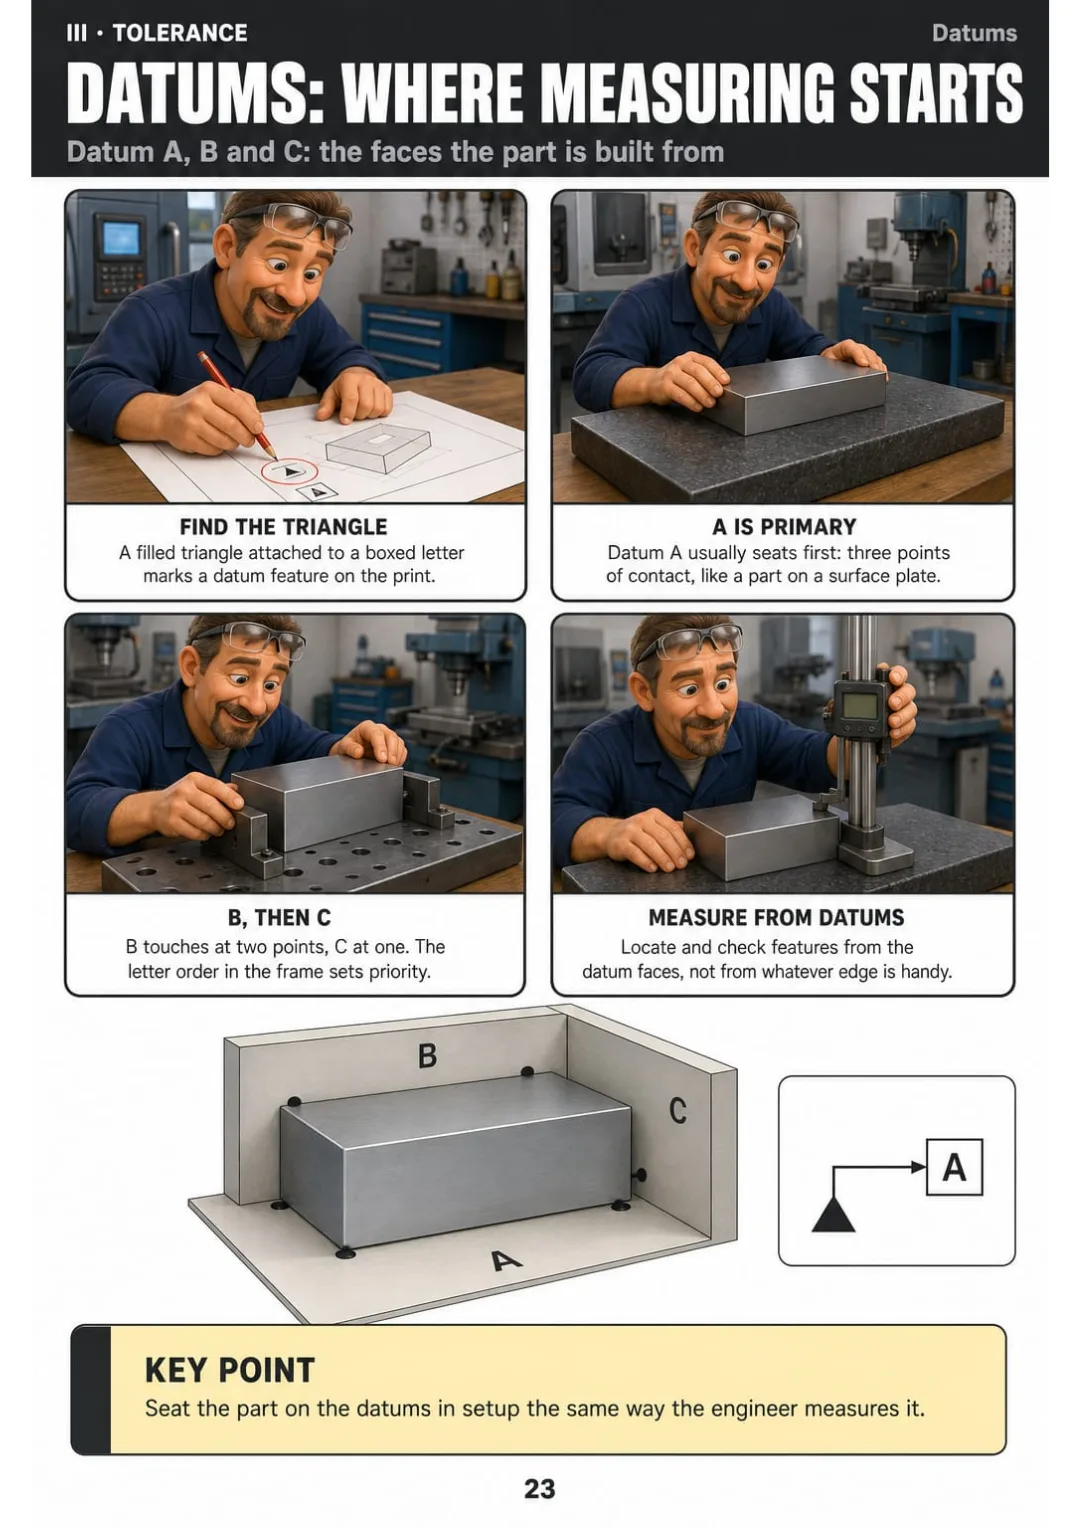
Datum A, B and C: three points, two points, one point, found by the triangle symbol.
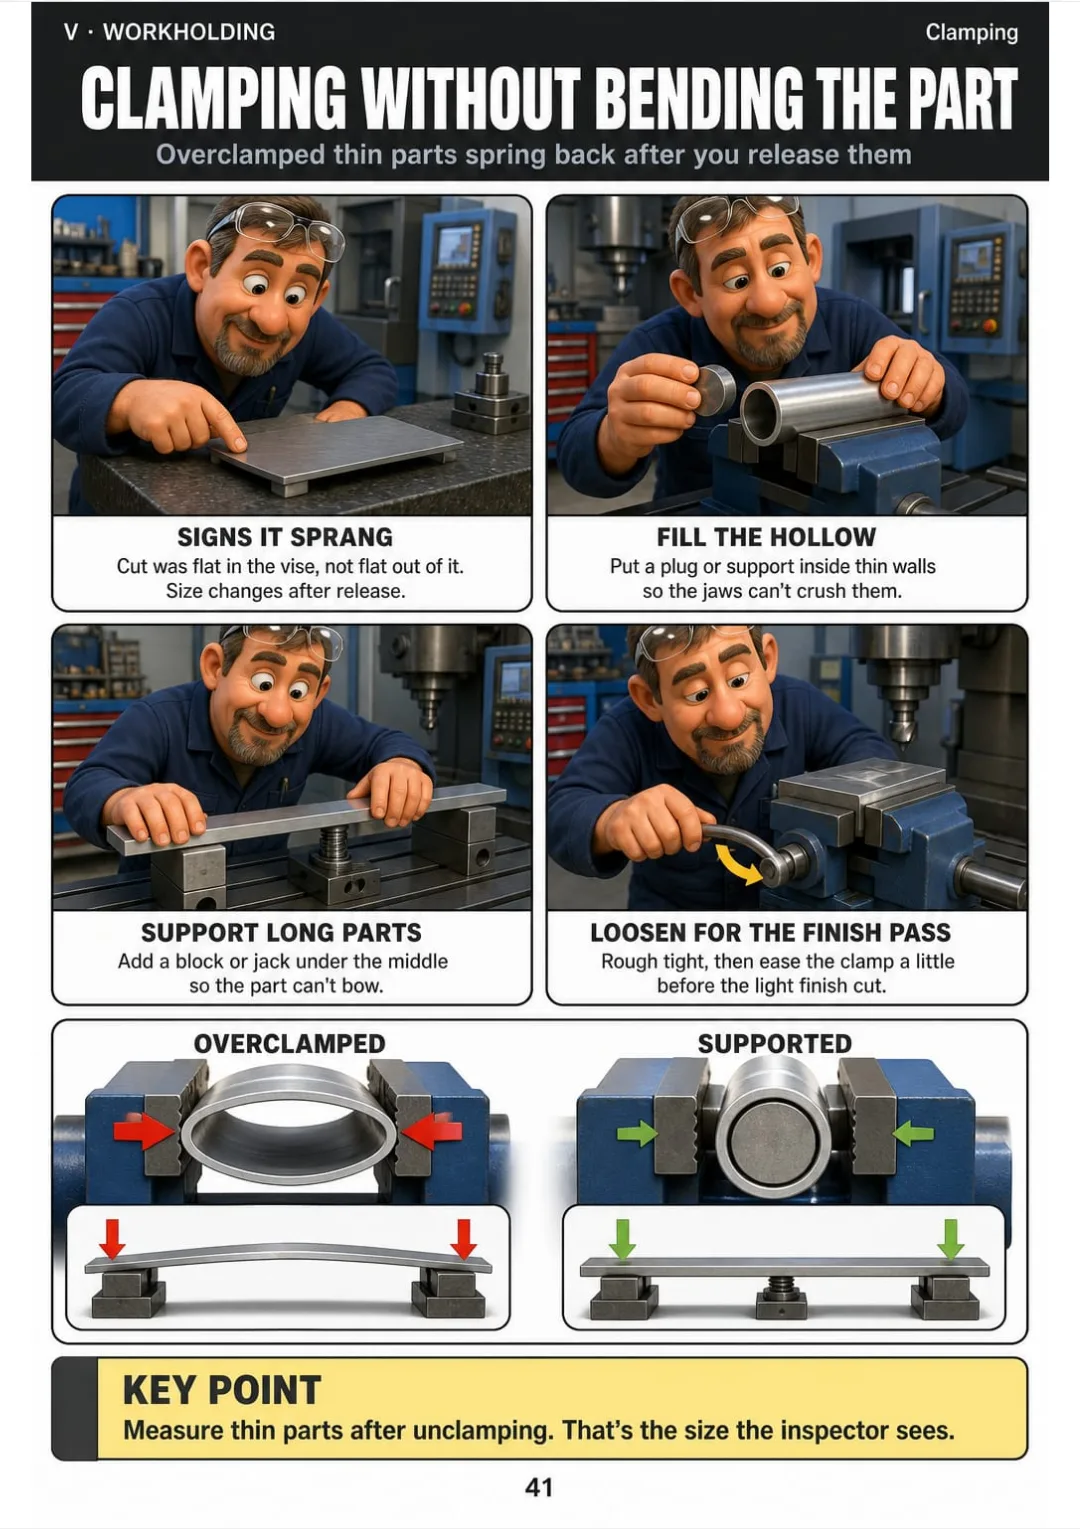
Thin walls and long parts spring when overclamped: plug them, support them, measure after release.
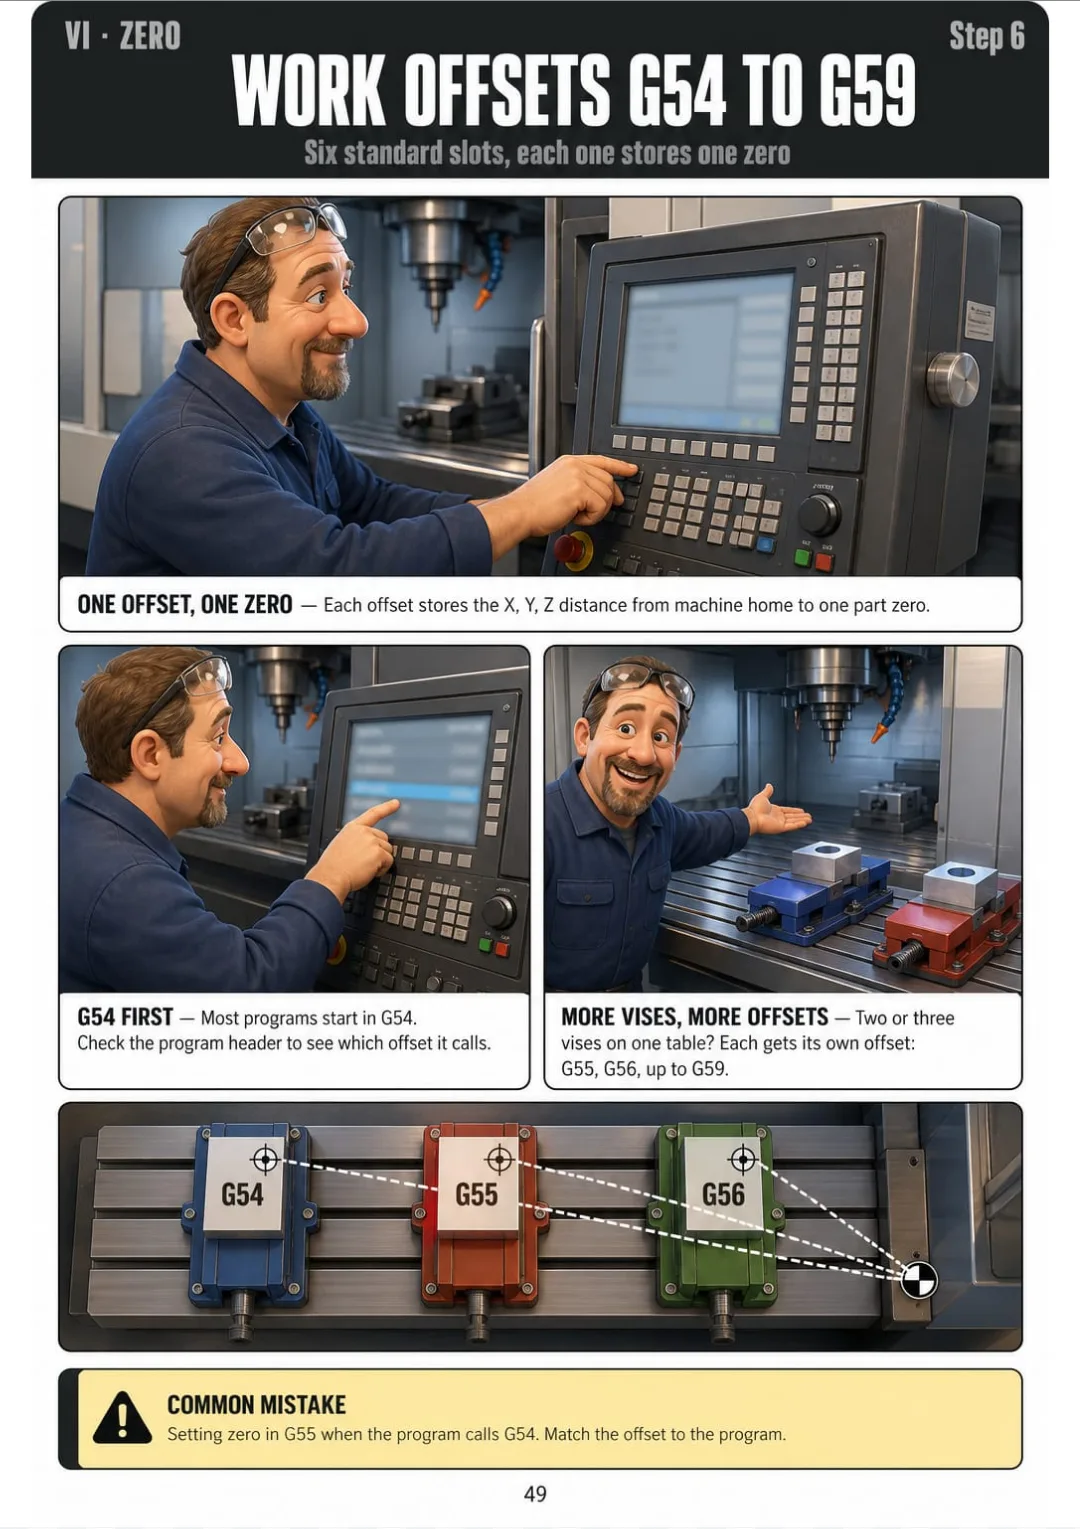
G54 to G59: one zero per slot, one slot per vise or part.
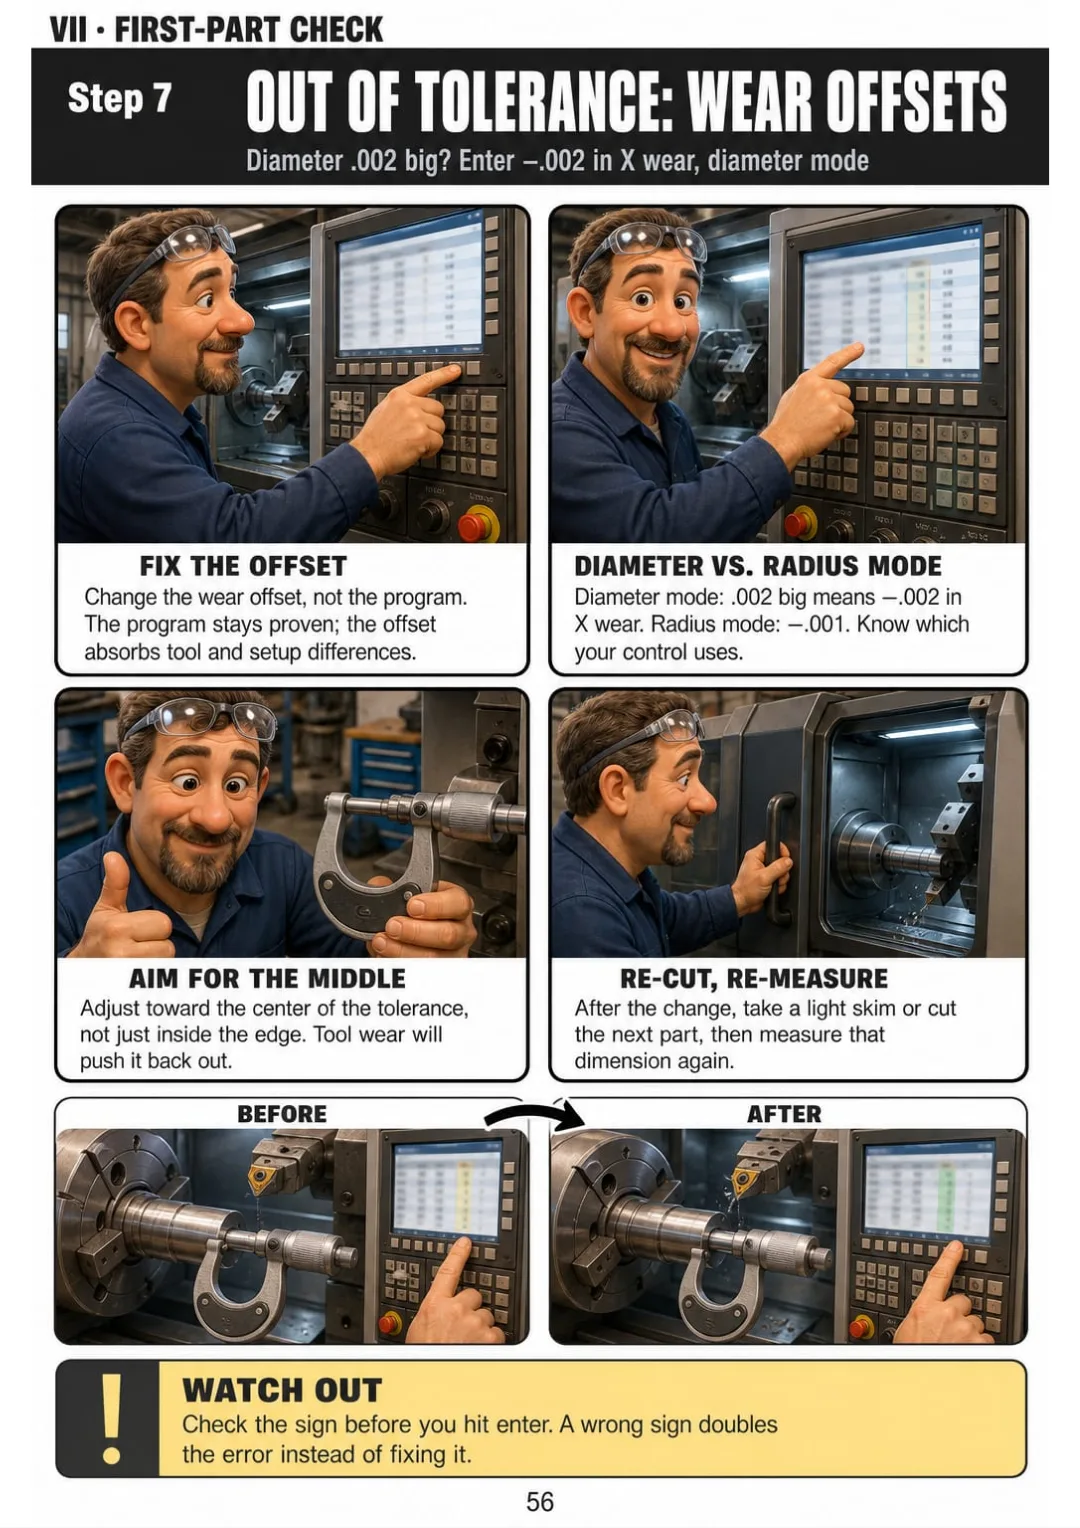
Diameter .002 big on a diameter-mode lathe: X wear −.002. Fix the offset, not the program.
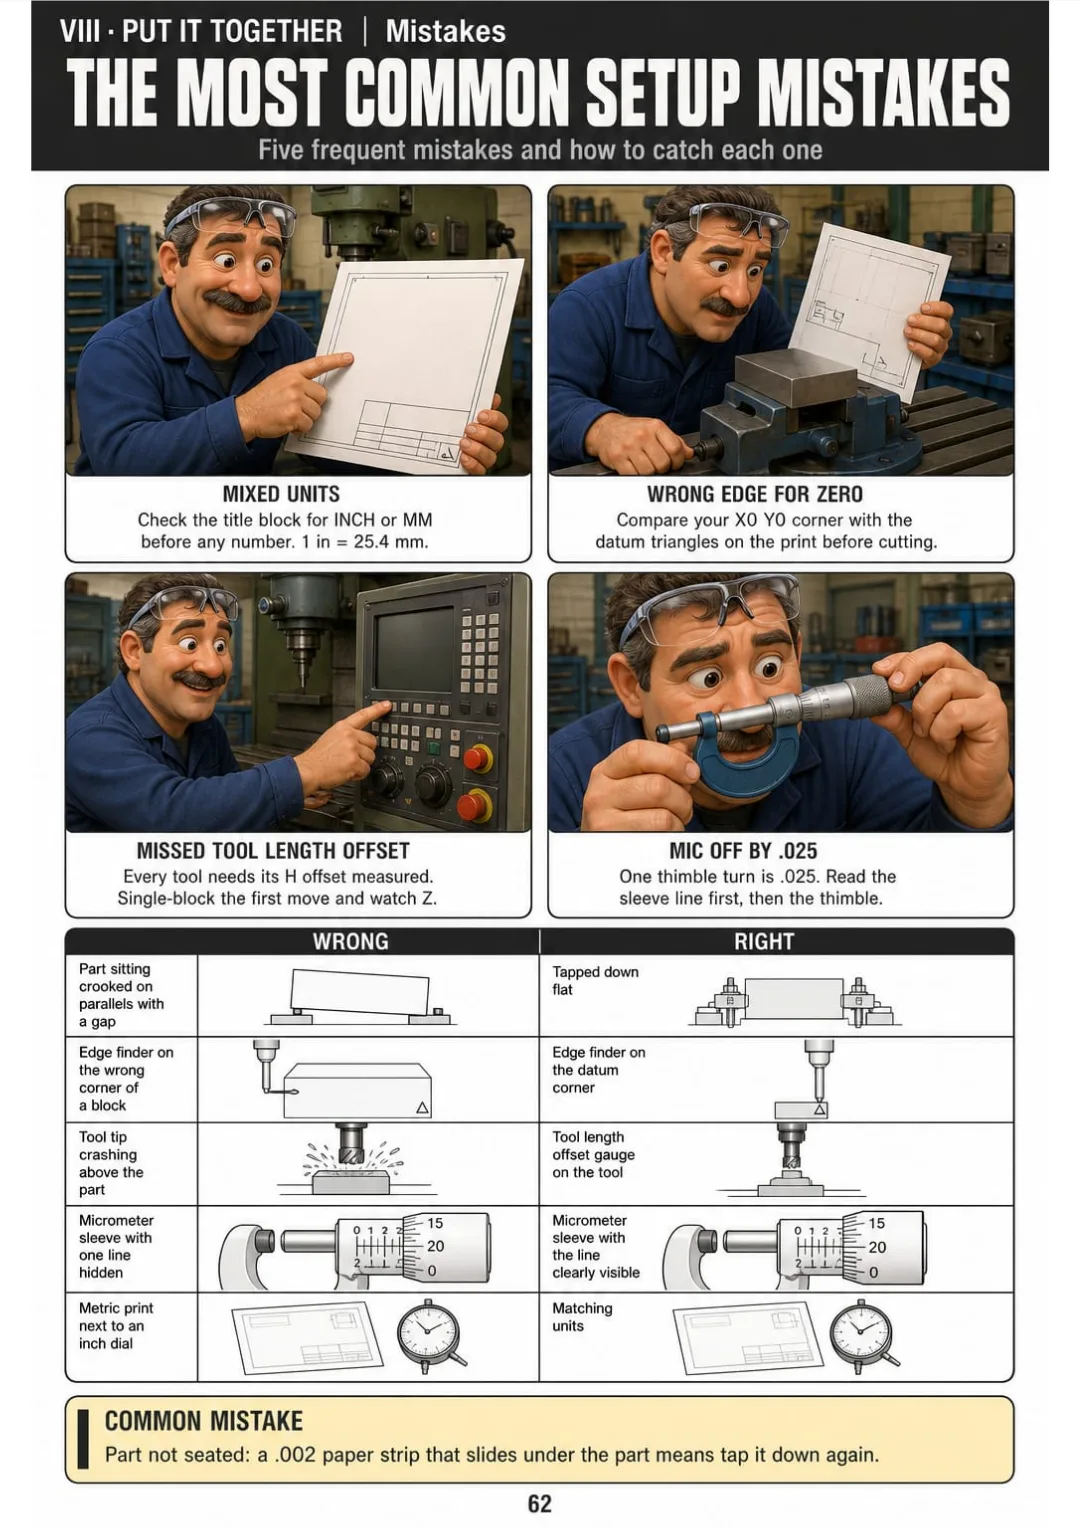
Mixed units, wrong zero edge, missed offset, mic off by .025, part not seated.

Swipe to see more · tap to zoom →

These are real pages from the book. The table of contents is the full one: 8 parts and 60 topics.

Freezing at the print isn't a skill problem. Setup was handed to you in pieces.

The lead hands you the print. You see a section view, a datum triangle and ±.002. Your mind goes blank. Not because you can't do it—because you don't know what to look at first.

You watched videos. You read the machine manual. You took notes in class. But when you're standing at the machine, none of it tells you: step one, step two, step three.

Datum A, B and C: three points, two points, one point, found by the triangle symbol.

This page shows you exactly where measuring starts. Datum A is the face the part sits on: three contact points. Datum B is contacted at two points, datum C at one. The triangle symbol on the print tells you which surface is which.

When you know the datums, you know where to hold the part, where to set zero and where to put the gauge. The rest falls into place.

You had the pieces. What was missing was the sequence that connects them.

Scrapped parts and wasted stock

One wrong zero or a missed offset means the first part goes in the scrap bin. The material, the cycle time and the tool wear are gone.

Hours lost guessing

Searching YouTube for "how to set work offset" at 10 p.m. and finding ten videos that each do it a different way. You end up more confused than before.

The look from the lead

Asking the setup guy to fix your zero again. He does it in two minutes. You still don't know what he did or why.

BUY NOW

🔒 Secure checkout · PDF by email · 30-day guarantee

SEE THE DIFFERENCE

The same topic, studied two ways

THIS
  • Read a long chapter on workholding theory and try to remember it at the machine
  • Watch five videos that each show a different vise and a different method
  • Ask the setup guy and hope he explains it the same way twice
When clamping thin-walled or slender workpieces in a milling vise, the operator must exercise caution regarding the magnitude of clamping force applied, as excessive force can introduce elastic deformation that yields dimensional inaccuracies upon release. For thin-walled sections, the recommended practice is to insert a conforming plug or support block inside the cavity to resist the lateral component of the clamping force, thereby distributing the load more evenly across the part geometry. Long unsupported spans should be backed with additional parallels or jack screws positioned beneath the workpiece. After initial clamping, the operator should verify part flatness using a dial test indicator swept across the top surface, then release and re-clamp if the total indicated runout exceeds the print tolerance.
FOR THIS
  • Open one page: the drawn rule, the drawn mistake and the fix, all in one look
  • Follow the same 7-step sequence on every job, every machine
  • Check yourself with the worked example and the answer on the same page
Thin walls and long parts spring when overclamped: plug them, support them, measure after release.
CONTENTS

Take a Look at the 8 Parts and 60 Topics

Every section matches a setup step, and every topic has its page number so you can jump straight to it at the machine.

IBefore You Touch the Machine · pp. 5-10
  1. The 7-Step Print-to-Part Sequence
  2. Why You Freeze in Front of the Print
  3. Inch Shop, Metric Print: Pick One First
  4. Reading Decimals the Shop Way
  5. Safety Before Setup
  6. What the Lead Expects From a Setup Person
IISteps 1 and 2: View and Dimension · pp. 11-19
  1. Third-Angle Projection, Drawn
  2. Read the Title Block First
  3. Line Types That Tell You Everything
  4. Section Views: What A-A Means
  5. Detail Views and Scale
  6. Linear Dimensions and Extension Lines
  7. Diameter, Radius and Depth Symbols
  8. Hole Callouts and Thread Notes
  9. Chain vs. Baseline Dimensioning
IIIStep 3: Tolerance · pp. 20-26
  1. What a Tolerance Really Is
  2. Bilateral, Unilateral and Limit Dimensions
  3. Default Tolerances in the Title Block
  4. Datums: Where the Engineer Measures From
  5. The Feature Control Frame in One Look
  6. Surface Finish Symbols
  7. The 10% Gauge Rule
IVStep 4: Gauge · pp. 27-36
  1. Choose the Gauge From the Tolerance
  2. Dial Caliper, Inch
  3. Four Ways to Use a Caliper
  4. Outside Micrometer, Inch
  5. Reading the Vernier for Tenths
  6. Outside Micrometer, Metric
  7. Zeroing and Checking Your Gauge
  8. Measuring Holes: Pins, Telescoping and Bore Gauges
  9. Dial and Test Indicators
  10. Feel, Heat and Dirt
VStep 5: Workholding · pp. 37-44
  1. The 3-2-1 Locating Principle
  2. The Mill Vise, Drawn
  3. Squaring the Vise to the Table
  4. Parallels and Seating the Part
  5. Clamping Without Bending the Part
  6. Three-Jaw Chuck on the Lathe
  7. Collets and Soft Jaws
  8. Pick the Workholding: A Decision Page
VIStep 6: Zero · pp. 45-52
  1. Machine Home vs. Work Zero
  2. Choosing X0 Y0 on the Part
  3. Finding an Edge With an Edge Finder
  4. Finding the Center of a Bore
  5. Work Offsets G54 to G59
  6. Tool Length Offset on the Mill
  7. Lathe Zero: Z on the Face, X on the Diameter
  8. Double-Check Zero Before Cycle Start
VIIStep 7: First-Part Check · pp. 53-58
  1. What a First-Part Check Is
  2. Balloon the Print
  3. Filling Out the Check Sheet
  4. Out of Tolerance: Adjust With Wear Offsets
  5. Burrs, Finish and Visual Check
  6. Handing Off the Setup
VIIIPut It Together: Practice and Checklists · pp. 59-64
  1. Worked Job 1: A Milled Block
  2. Worked Job 2: A Turned Shaft
  3. The 7-Step Setup Checklist
  4. The Most Common Setup Mistakes
  5. Questions to Ask the Lead Before You Start
  6. Quick Reference: Symbols and Conversions

Each page: a single setup idea and its drawing.

Each page covers one idea: the tool, the rule or the step you need, with its drawing right there. Short labels, not paragraphs. No flipping back three chapters to find the diagram.

G54 to G59: one zero per slot, one slot per vise or part.

This page shows you the six work-offset slots, G54 through G59. Each slot stores one zero for one vise or one part. The drawing shows which number goes where.

You see the table, you see the part, you see the offset number next to each one. That's all you need at the machine.

Look at the drawing once, and you'll find it again at the machine.

BUY NOW

🔒 Secure checkout · PDF by email · 30-day guarantee

Here Is What You Get with Machinist Setup: Print to First Part:

Ipp. 5-10

Before You Touch the Machine

The 7-step sequence—read the print, find the datums, read the tolerance, pick the gauge, hold the part, set zero, check the first part—plus why you freeze in front of the print, inch vs. metric ground rules and what the lead expects from a setup person.

IIpp. 11-19

Steps 1 and 2: View and Dimension

Third-angle projection, the title block, line types, section views, dimensions and hole callouts—everything you read before you touch a tool.

IIIpp. 20-26

Step 3: Tolerance

What a tolerance is, bilateral and limit dimensions, datums, the feature control frame and the ten-percent gauge rule.

IVpp. 27-36

Step 4: Gauge

How to choose the gauge from the tolerance, read calipers and micrometers in inch and metric, measure holes and use indicators.

Vpp. 37-44

Step 5: Workholding

The 3-2-1 locating principle, the mill vise, parallels, clamping without bending the part, chucks, collets and a decision page.

VIpp. 45-52

Step 6: Zero

Machine home vs. work zero, edge finders, work offsets G54 to G59, tool length offsets and lathe zero on the face and diameter.

VIIpp. 53-58

Step 7: First-Part Check

The first-part check: balloon the print, fill out the check sheet, adjust with wear offsets and hand off the setup.

VIIIpp. 59-64

Put It Together: Practice and Checklists

Two worked jobs (a milled block and a turned shaft), the 7-step checklist, common mistakes and questions to ask the lead.

And That Is Not All: 2 More Books, Free

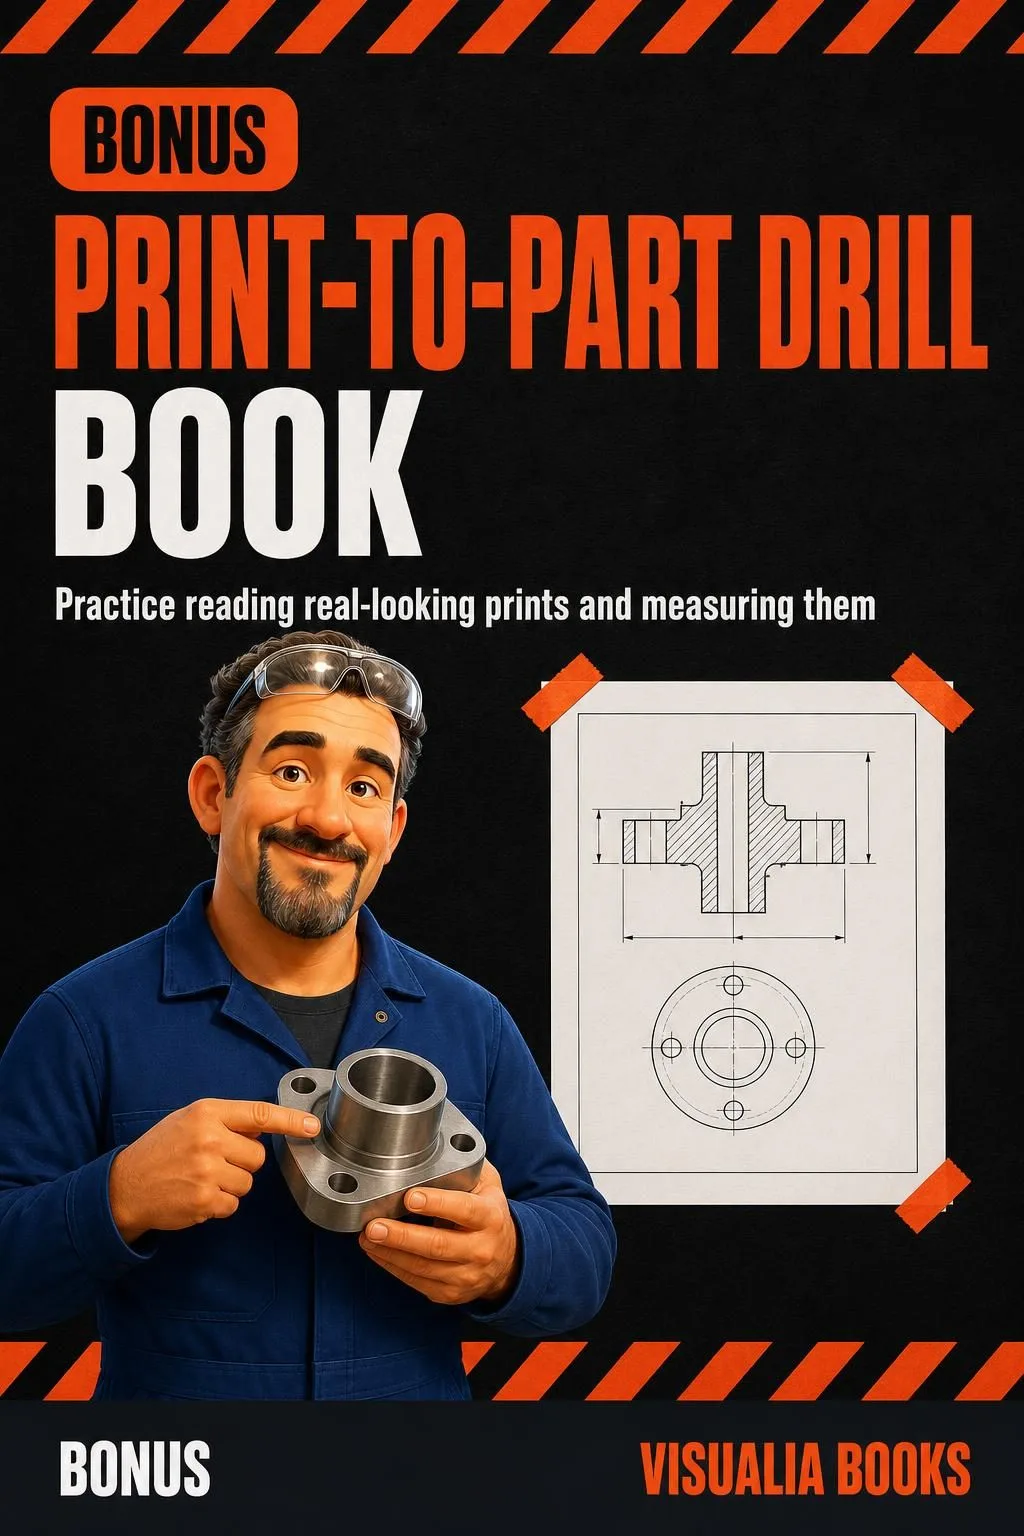
Print-to-Part Drill Book

BONUS 1: «Print-to-Part Drill Book»

Value on its own: US$ 17.90

Practice reading real-looking prints and measuring them, with every answer worked out so you can check yourself.

Shop Floor Mistakes Cards

BONUS 2: «Shop Floor Mistakes Cards»

Value on its own: US$ 14.90

The most common setup and measuring mistakes, each on one card, so you catch them before the first part comes off.

Machinist Setup: Print to First Part + 2 Free Books

  • Machinist Setup: Print to First Part: 60 illustrated pagesUS$ 63
  • BONUS 1: Print-to-Part Drill BookUS$ 17.90
  • BONUS 2: Shop Floor Mistakes CardsUS$ 14.90
  • High-resolution PDF to printIncluded
Total value US$ 95.80
YOUR PRICE:
US$ 27
You save US$ 68.80
BUY NOW

📄 This is a digital PDF book sent to your email: nothing is printed or shipped.

Secure purchaseEncrypted payment30-day guarantee

PDF by email: Machinist Setup: Print to First Part reaches your inbox as a PDF, and the two free books come by email too. One-time payment, no installments or hidden costs.

Who keeps this book by the machine

CNC operator ready to move into setup

CNC operator ready to move into setup

You load and unload parts every day. You know the machine runs, but when someone says 'set it up,' you don't have a fixed sequence. This book gives you one.

Machining apprentice or career changer over 40

Machining apprentice or career changer over 40

You're in a program or a new shop after years in another trade. The textbook is thick and class moves fast. This book puts the essentials on sixty illustrated topics you can review at the bench.

Setup person who wants fewer callbacks

Setup person who wants fewer callbacks

You already do setups, but sometimes you miss an offset or second-guess a datum. The 7-step checklist and the mistake cards keep you from skipping a step when the shift is busy.

To Sum Up: Here Is What You Get

US$ 95.80US$ 27
BUY NOW

📄 This is a digital PDF book sent to your email: nothing is printed or shipped.

30DAYS
GUARANTEE

30-Day Guarantee

30-day guarantee: tell us what didn't work and we'll refund 100%.

100% money-back guarantee for 30 days. Use it at work on a real setup. If it doesn't save you time or clear up your doubt, tell us what didn't work and we'll refund every cent.

Frequently Asked Questions

Is this a physical book or a digital file?

This is a 64-page digital PDF delivered by email: 60 illustrated topic pages, plus the cover and three contents pages. The printed page numbers include those four opening pages. Read it on your phone, tablet or computer, or print it.

Can I read it on my phone?

Yes. Every page is designed to be readable on a phone screen held vertically.

Does it cover my specific machine or control?

Yes, if your shop runs standard G-code. The examples use G54–G59 work offsets, tool length offsets and wear offsets the way most shop controls handle them, on both mill and lathe. Button names and screens change from control to control, so keep your control's manual next to the book for those; the order of the setup doesn't change.

Is it in inches or metric?

Inches are the main system: decimals in thou, the way US shop prints are dimensioned. Metric has its own separate pages for when a metric print shows up. The two are never mixed on the same page.

I already work in a shop. Is it too basic for me?

It's not a beginner's introduction to what a mill is. It's a fixed method to go from the print to the first part without skipping a step. Operators with years on the floor use it to stop second-guessing datums, offsets and tolerances.

Does it prepare me for a certification like NIMS?

The content follows the same topics covered in NIMS Machining Level I skill standards, but this is not an official NIMS product and does not guarantee certification. It's a study and practice tool.

Is this a one-time payment?

Yes. You pay once and the PDF is yours. No subscription, no recurring charge.

Where does the PDF arrive?

You get the PDF by email at the address you enter when you pay.

Does it replace hands-on training or supervision?

No. It's a study reference. You still need shop training, supervision and your employer's safety procedures before operating any machine.

One Last Thing Before You Decide...

Next time the lead hands you a print, you won't stare at it hoping someone walks by.

You'll read the datum, pick the gauge, set your zero and check the first part—same order, every job.

The steps are drawn. You just have to follow them.

One book, sixty illustrated topics, and the guessing stops. Open it at the machine and start your setup.

One-time payment: US$ 27 · Guarantee: 30 days · PDF by email

BUY NOW

📄 This is a digital PDF book sent to your email: nothing is printed or shipped.